January Stress Test Play Guide
The Stress Test will start Thursday January 5th at 12:00 PM (Noon) US Central Time (Countdown) and last for around 10 hours.
Client Download: https://community.orbusvr.com/t/january-stress-test-client-download/393
You need to download the client (in the above link) to play in the Stress Test. The client from the last test will not work.
Welcome Back to OrbusVR
If you joined us for a previous Stress Test, welcome back! There's a ton of exciting new stuff to show you. In particular, you'll want to read the Warrior, Inventory, and Player Menu sections since the way those work has changed (or they're new). Also note the addition of the Airships and Loot, and you have separate levels for each class (so you can level each class from 1-4 separately during the test if you want to).
Feedback During the Test
We have a forum post here where you can chat with us during the test itself:
https://community.orbusvr.com/t/january-stress-test-feedback/395
We'll try to monitor that thread during the test so if you run into a major bug or something, we'll do our best to help. However, keep in mind this is basically a prototype, so it may break and we may not be able to fix it during the test. If there's anything crazy going on, like we need to restart the server or end the test early for some reason, we'll post in there. It's probably worth keeping that thread open in a browser window while you're playing so you know what's going on.
Playing the Game
The first time that you log in, you will be a Ranger and start in the Village. If you ever get stuck while playing the game, use the "Teleport to Town" feature in the Menu (more on that below). If you close the game and re-open it, your equipment (including your class) and your position will no longer reset, so you'll be right where you left off.
Switching Classes
To switch between classes, just equip the weapon for the class that you want to be. For example, to use the Runemage class, just equip the Beginner's Wand in your inventory. In OrbusVR, each class has its own skill level. So if you level up to level 4 as a Warrior, then switch to a Ranger, you'll start back off as a Level 1 Ranger. If you then re-equip your Sword, you'll switch back to a Level 4 Warrior.
Getting Around
The default locomotion is Teleportation. For the Ranger, you use the arrow controller to teleport. Just press down on the Trackpad to bring up a green line, then let go to teleport. You will notice a grid building up, showing how far you can teleport. The longer you wait, the farther you can teleport.
Note that the controller you use for teleporting is the opposite hand of your weapon slot. So if you put your Bow in your left hand (the default), you use your right hand to teleport. If you put your Runemage wand in your right hand (recommended for right-handed folks), then you would use your left hand to teleport.
In addition to the Teleportation locomotion, you can turn on Trackpad locomotion in your Player Menu. Once this is active, you use the trackpad on the teleportation hand to move around. Just touch the pad toward the top to move forward or bottom to go backward. The farther from the middle you touch, the faster you go. You will travel in whatever direction your controller is facing. Note that once you are in combat, you can only Teleport, and Trackpad locomotion will resume once combat ends.
If you get 'stuck' in combat (which can happen sometimes), and your Trackpad locomotion won't work, there is an option in the Player Menu that says 'Stuck in Combat', press that and it will fix the bug. We're still trying to track that one down.
Airships
There is an airship in the game now that acts as a taxi. There is currently a port at the starter village, and a port near the Lakewood Inn. To board the airship, just wait for it to come to the dock, then a bridge will extend out to the ship with a "teleportation hotspot" that appears on the bridge (like going up or down the stairs). Just use that to board the ship, and do the same thing at the other end to get off.
Leveling Up
You will start at level one. You gain XP for each monster you kill. You can advance to level 4 in the current prototype. If you look up you can see a green XP bar to show your progress. You'll also see your current level. The XP you gain goes toward your current class. So if you are currently a Ranger, your Ranger level goes up. If you switch to a Warrior by equipping the Beginner's Sword, your level will switch as well, and you'll now apply your XP toward becoming a higher-level Warrior.
Note that the level of the monsters in the game is displayed next to their names, so don't fight things that are way higher level than you. All monsters in the game will attack you ("aggro" you) if you get too close to them -- so watch out!
Dying
If you die, you just go back to the starting Village. No other penalty right now.
How do I talk to the other players?
By default Voice Chat is enabled, so be sure that on your PC your Input device is set to your Vive's microphone (it shows up as 'USB Device' for me). There are options in the Player Menu to disable your own voice chat, or to mute other players. The Voice Chat is currently only proximity based, so you will hear people nearby and not hear people far away. Just talk in a normal inside voice, there's no need to shout.
NPCs
There's currently just one NPC in the game, it's near where you spawn in at originally. Note that currently she doesn't actually give a quest or talk to you or anything. Hopefully by the next test we'll finally have that in the game.
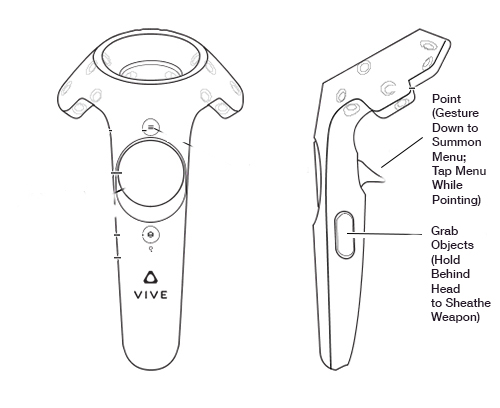
Sheathing / Unsheathing Your Weapons
Sometimes you might need a free hand available, to grab something off the ground, open a door, or use your Player Menu. To temporarily stop using your weapon, just reach behind your head and press the Grip button (just press it, don't hold it down). When you bring your hand back down it should be a hand instead of a weapon.
Once you're done with whatever you're doing and you want to get your weapon back out, just do the same thing again -- reach back behind your head and press the Grip button. You will get your weapon back out so you can keep fighting!
When you have a free hand available, these are the controls for your hand:
Loot!
New in this test is loot! Sometimes when you kill something a bag will "pop out" of the monster. To get it, just walk over to it and grab it with a free hand using the Grip button. Once you pick it up, you can see what's inside of it. If you want to collect it, just bring the bag into your body and the loot will appear in your Inventory!
Note that if you don't have a free hand (such as the Ranger) you'll have to sheathe one of your weapons to pick up loot.
What about PvP, quests, crafting...?!
This is just a test of the networking of the game. At this point we are still a long ways from having all that stuff in. But hey at least you get to fight stuff right? :-)
Can I record video or stream the game?
Absolutely! It would be nice if you would note that this is only a prototype when you inevitably broadcast a game breaking bug to all your viewers, but we're flattered you'd like to show off the game to others! Thanks!
The Player Menu
The Player Menu is the way that you can change your settings for locomotion, voice chat, mute other players, and get help if you need it.
How you open the menu and use it has changed since the last test!
To open the menu, you need a free hand without a weapon in it. For some classes like the Runemage you always have a free hand. For others like the Ranger you have to sheathe one of your weapons first.
Once you have a free hand, pull the Trigger on the controller to "point" your finger. Then make a downward gesture with your finger pointed outward. Do it pretty quickly! The menu will then appear.
Once the menu is active, hold down the Trigger to keep "pointing" your finger, then just touch your finger to the menu buttons to press them.
The top-most option allows you to view a list of all players nearby. Select a player and then you can select "Mute" to mute their voice chat if they're being annoying.
The backpack icon allows you to open your inventory screen, which is where you manage your equipment as well. More on that below.
Under the Gear icon, you can change your own settings, including to change if you want to enable or disable Voice Chat (which will stop you from broadcasting your voice to other players), and what type of Locomotion you want to use.
The Life Raft icon provides you with two temporary but helpful during alpha options, one which will return you to the Starting Village, and the other which will put you out of Combat if you seem to be stuck in combat and can't get around quickly anymore.
Inventory and Equipment
The game now features a full inventory and equipment system. As you acquire loot from killing monsters, you will find it placed in your inventory. Note that there is currently no way to delete things from your inventory, and once your inventory is full it's full, so avoid picking up lots of the same thing for now.
To equip an item, just tap it to select it in the inventory, then tap the box you want it to go into. Note that equipment has specific slots it has to go in, if a piece won't go into a slot make sure it's the right type of equipment for that slot.
Equipment gives you Attack and Armor. Increasing both makes you more effective in combat. You'll notice that the equipment is class-specific currently -- so you can only get the benefit of the "Runemage's Shirt" if you are currently a Runemage. If you aren't a Runemage, you can still equip it, but it just won't have any effect (and it will look like you don't have it on).
You can "hover" over an item in your Inventory with your finger (while pointing) for a second and it will show a box with more information on the item.
You start the game with a basic weapon for each class so you can choose any class to play by simply equipping that weapon into the weapon slot.
The Classes
Here's a quick guide to each class and how to play it.
Important Note: The controller diagrams below are a little old -- they say "Right" and "Left" hand instead of "Primary" and "Secondary." Which controller you use depends on which hand you put the weapon into on your Inventory screen. For example, if you place your Runemage wand into your Left hand instead of your Right, you would use the Left controller to cast spells. It should be pretty straightforward and obvious, but it's worth noting all the same.
The Warrior
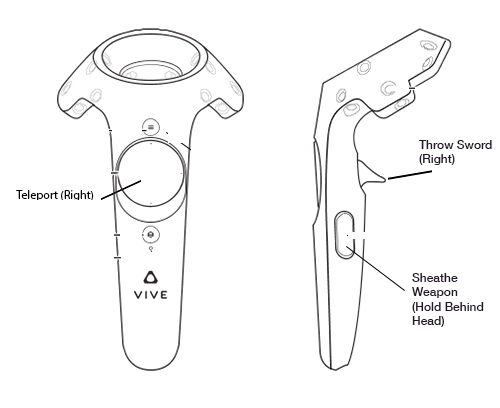
The Warrior is a new class that we're introducing in this test. It replaces the Barbarian class we had previously as the tank role. The Warrior features a sword and massive shield.
Use the sword is straightforward -- just swing it and hit stuff! The amount of damage that the sword will do is based on the distance the sword travels between strikes and the force with which you swing it. So "waggling" the sword around on the enemy simply won't work. Your best bet is to take large, arcing swings like a true knight of valor!
In addition to basic sword strikes, you can also throw your sword ahead of you. Just hold down the Trigger button on your sword, then make a throwing motion with it and let go of the Trigger. The sword will arc through the sky and plant into the ground. From that point you have 10 seconds to press the Trigger again, which will teleport you to the sword's location. When you teleport, you'll also shield any nearby allies and taunt any creatures at the new location.
The shield in your other hand has two primary functions. First, it actually blocks projectiles -- not super useful for the current set of monsters but it will come into play in the future and it blocks player projectiles (like Runemage missiles) during PvP (which isn't in the game yet).
If you swing the shield into a monster it will stun the monster for two seconds.
Finally, if you "plant" the shield forcefully into the ground, it will spawn a magical shield. This magical shield blocks monster AoE ("red zone") attacks. So for example if you plant your magical shield and then the Dragonbug breathes fire at you, you would be protected as long as the shield is between you and the fire breath source. This applies to all of your allies as well.
The Ranger
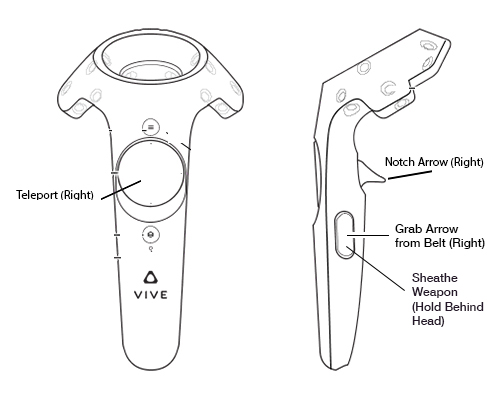
The Ranger is pretty straightforward to play. It's a bow and arrow archetype, which lots of VR games have already done. Put the bow controller in your off hand and the arrow controller in your dominant hand. Then just put the arrow near the bow string, pull the trigger on the arrow hand, and pull back and release to fire. The distance that you draw that arrow back determines how far the arrow will fly. The direction of the arrow is guided by the position of your arrow hand relative to your bow hand.
In addition to the basic arrows, the Ranger has 2 special arrows to choose from. They will appear on your waist belt when they are ready to use. To use them, just hover the arrow controller over the arrow you want to grab, and use the Grip button the controller to grab the arrow. Then just fire it like normal.
- Rain of Fire: Causes your next arrow to spawn an area of effect attack at the location (if you hit the ground it spawns there, if you hit an enemy is spawns on the enemy). Has a fire particle effect.
- Poison Shot: Puts a poison on the enemy that does damage over time. Has a green particle effect.
Note that if you imbue an arrow with an ability and then miss your shot, you just wasted the ability!
In addition to that, once every 6 seconds you can super-charge a shot by notching an arrow, then pulling back all the way and holding the arrow for around 2 seconds. You'll see a purple "gathering power" effect, then the arrow tip will turn purple with power when it's ready to fire. This shot does significantly more damage, and can be combined with a special arrow like Poison to do a very effective shot.
Finally, the Ranger is the only class so far that has its Super ability in the game. When your blue bar fills up all the way, you can pull the Triggers on both of your controllers at once to engage your Super ability. Your bow will pulse with energy, and during this time you do increased damage and your abilities recharge more quickly. When the blue bar depletes, your super will end.
You build up your Super charge more quickly by chaining together hits of targets without missing, and by hitting targets from far away.
The Runemage

The Runemage is one of the most interesting classes we've been designing thus far. Rather than having a set of ability buttons to choose from, the player must memorize rune patterns that they then draw with their wand. Drawing the correct rune will cast the spell.
To draw a rune, just hold your Wand controller in front of you, and press down on the Trigger button. Currently the runes all require two strokes to draw. So you would draw one stroke, then release, then hold again to draw another stroke.
Once you've drawn the rune, press the Trackpad button on your Wand controller to "submit" the cast. If you were successful, you will see the spell appear on your Wand tip. Press the Trackpad button again to cast the spell. If you were not successful, no spell will appear, and you can try drawing again. If you mess up while drawing, just press the Trackpad button to clear the rune and start over.
After you cast the spell, you must guide it. While the spell is flying through the air, it will move in whatever direction your wand is pointing. The spell will collide with the first thing it hits, be it friend or foe (although currently there is no friendly fire). Also note that the spell will only go so far before fizzling out.
Here are the diagrams of the runes currently available:
Fireball -- casts a classic fireball spell that deals damage to the target.

Frostbolt -- casts a frost bolt at the target that slows its movement speed

Arcane Ray -- casts a ray that shoots out from the wand's tip that deals damage to all targets caught in its line.

Shield -- casts a protective barrier on the first friendly target it hits, decreasing damage taken

It may take some practice to draw all the runes correctly. Good luck!
Note that the runes you draw will be changing before the next test. Also there is a hidden 'create a portal' ritual you can now do...read back through our Twitter feed to see how it's done ;).
The Musketeer
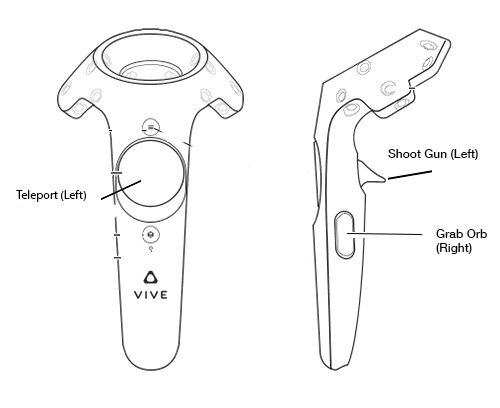
The Musketeer (formerly called the 'Orbhealer') a gun-based class which focuses on buffs and debuffs, as well as healing, that can be used by loading the gun with special orbs.
You can fire the gun by just aiming and pulling the trigger. It will fire a basic bullet. To load it with a special ability, just use your other controller that looks like a Hand to grab (using the Grip button) an orb floating around the gun, then bring the orb near the end of the barrel (the opening) of the gun. It will "load" the gun with the orb, then you can fire it like normal.
Each of the orbs acts like a mini-grenade, so it has a small range from where it explodes. So for example if you have a group of enemies you can hit all of them with a single Poison orb. Feel free to aim for the ground instead of the enemy itself as well.
The orbs are as follows:
- Renew: A yellow-glowing orb with a "charging up" effect. Heals allies over time.
- Heal: A yellow-glowing orb with a "bursting outward" effect. Heals allies a medium amount immediately.
- Bolster: A brown-and-green orb. Increases the armor of allies.
- Weaken: A purple orb. Decreases the armor of enemies.
- Poison: A green orb. Causes damage over time to enemies.
- Frost: A blue orb. Causes enemies to move more slowly when hit.
In addition to the orbs on the gun, you have a 'turret' orb on your belt. To use it, just grab it using your Hand controller and then throw it up into the air. It will fly for a second and then start floating in the air. The turret will automatically attack any enemies that you attack or that start attacking you that are in its range. Once it is deployed it cannot be moved.
If you fire an orb from your gun and hit your turret, your turret will be destroyed, but the range of the orb will be greatly magnified. This can be really useful for healing your whole group or damaging a large number of enemies -- just make sure you don't upset too many of them! Your turret orb regenerates on your belt after about 12 seconds.
The Fisher
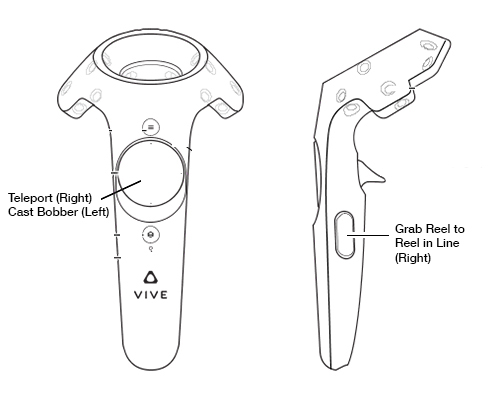
The Fisher is a new class with a fishing pole that can...go fishing! Once you've activated it, head out to the nearest body of water (there's a giant lake just waiting for you!)
To fish, just use the fishing pole controller to cast out your bobber, by pressing down on the trackpad, then releasing while in the motion of casting your line (just like using the 'button' on a real fishing pole). If your bobber lands in the water, you'll see a splash effect and your line will appear. If you hit land, your line will 'break' and your bobber will disappear -- you can then try again.
Once your bobber is in the water, use your Hand controller to grab the reel on the fishing pole (using the Grip button). Then just make a reeling motion by circling your hand around the reel to reel in the line.
If you're lucky, while you're reeling in the line you will get a bite. If that happens you'll feel a heavy rumble on your controller. Jerk back on the pole to hook the fish before it gets away! Then reel your bobber to the shore to get your fish. If you don't hook it in time, you'll get a message saying the fish got away.
Once the bobber is back at the shore, either with a fish attached or with nothing, you can re-cast the fishing pole to try again. You'll probably have to try several times before you catch your first fish.
Note that currently you just catch the same fish every time. Eventually you'll have to get certain bait to catch certain fish, and the fishing itself will be much more involved.